What is an Inspection System?
The inspection system is a tool to “Improve Quality and Productivity”.
Within the production process there are increasing demands to achieve “higher quality” and “higher value-added” products. To differentiate yourself among competitors, it is necessary to improve quality, reduce waste and speed up production.
Our products have been assisting customers in improving quality and productivity for over 30 years and during this period we have gained a reputation in the market as one of the leading suppliers for inspection quality control.
In the following sections we describe in more detail the Inspection System.
What is an Inspection System
The Inspection System is a device to detect a “defect” (flaw), using a CCD line sensor camera.
A continuously running web or sheet is scanned with a CCD camera to detect contamination.
Typical defects that occur in the production process are splashes, scumming, wrinkles, pin holes, missing text, tears, scratches, doctor knife streaks and color variation.
Implementation Effect
The implementation of the Inspection System enables you to differentiate yourself from your competitors and increases your ability to improve quality and productivity by reducing waste which improves yield and prevents faulty material reaching your customers.
As shown in the figure of the Inspection System, it can be applicable to roll-to-roll or sheet-to-sheet applications.
Typical materials are Film, Paper, Carton board, Aluminum and Nonwoven fabrics.
Principles of Inspection Systems
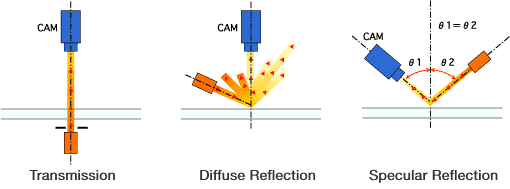
An inspected material continuously running is captured by a CCD camera and flaw detection is carried out by using its captured information. To have constant inspecting conditions, a light source is located near the inspected object to secure a certain level of light.
<Light Source Examples>

- ・Transmission
- The light level change which is transmitted through an inspected material.
It is intended to detect light-intercepting problems, such as foreign matter and light-transmitting defects, such as holes.
- ・Diffuse Reflection
- The light level change which is reflected from an inspected material.
This lighting is used to find those defects which have a contrast change on the surface, such as splashes and wrinkles.
- ・Specular Reflection
- The light level change which is reflected at an angle from the material surface.
This lighting is used to find uneven flaws, such as dents or missing lacquer.
These 3 light forms are most commonly used in a wide range of applications. We can propose alternative lighting solutions and these are identified during sample testing.


